

Here’s how to create a team on your phone.
Once you’ve created your account and added in your personal details, you’ll be directed to the Sports Bridge Dashboard. As you haven’t created a team just yet, you’ll see this popup.
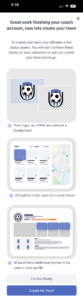
If you tap the ‘Create My Team’ button you’ll be directed straight to the create my team page. If you tap the ‘I’m Not Ready’ button the popup will close and you’ll see your Sports Bridge Dashboard with no team information on which will look like this.
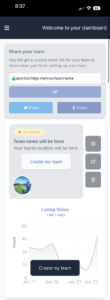
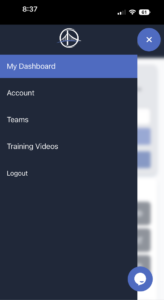
From here you can tap any of the ‘Create My Team’ buttons on this page, or you can navigate to the Teams tab from the side navigation.
In the Teams tab you’ll see placeholders for where your team information will go once your team is created. Here you can tap the ‘Add team’ button at the top of the page or the ‘Create my team’ button to open the create my team editor.
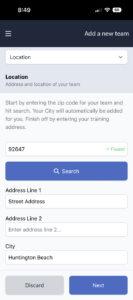
Once in the create a team editor you’ll start with your teams zip code, this can be the zip of your primary training ground. Type the zip and hit the ‘Search’ button. You’ll see a green ‘Found’ sign next to the zip to confirm you’ve entered it correctly.
Next you’ll need to fill in the rest of the address and you’ll notice the City has been filled out for you. Once you’re done you can tap ‘Next’.
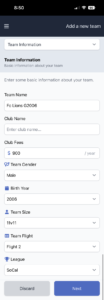
Next is the Team Information. Go through and add the following
- Team name
- Club name (optional – if this is selected your clubs logo will be automatically added for you on the next screen)
- Club fees (optional but highly recommended)
- Team gender
- Birth year
- Team size
- Team flight
- League
Once you’ve filled these out you can tap ‘Next’
Next is Team Logo. If you selected your club from the drop down list on the Team Information page, you’ll see your club logo already here for you. If you did not select a club then you can manually upload your club logo but tapping ‘Browse Images’ and then selecting your clubs logo from your phones camera roll.
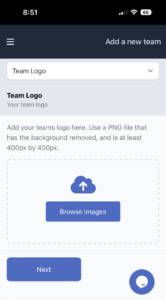

Once your clubs logo is in place tap ‘Next’.
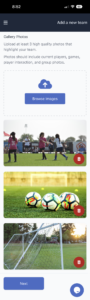
Next is photos. Photos are super import when it comes to your teams profile. They are what show up in the search results, they feature prominently at the top of your profile.
Read more: Taking Better Photos of Your Team
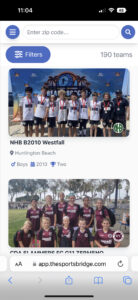
At the top you’ll see an option for uploading a cover photo. The cover photo is what parents see in the search results. See the image below for how cover photos are presented in the search results.
To add your cover photo select the ‘Browse Images’ button and then choose where you want to upload the photo from.
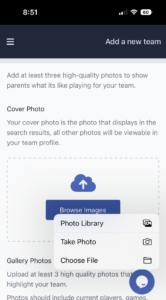
Once you’ve chosen the photo you want as your cover photo, you’ll need to upload at least 3 more photos, these photos will live with your cover photo at the top of your profile and give parents a great real world, at a glance, view of your team.
To add these photos you’ll see a second box with a ‘Browse Images’ button in the ‘Gallery Photos’ section just under the ‘Cover Photo’ section.
Now your photos are uploaded you’re onto Overview.
This is where you can add information about your team that you want parents to know, there are prompts to help you fill out information here but feel free to add as much extra information as you want.
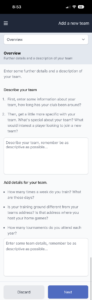
Once you’ve finished typing here, you can tap ‘Next’.
Here is where you can add your teams achievements, the achievements you add here will feature on your team profile with a trophy graphic next to them, so add as many achievements as you can think of.
Tap the ‘Add Achievements’ button and type the achievement you want to feature, do this for as many as you want to feature. Each box represents one achievement so separate them out one by one.

Once you’ve added all your teams achievements tap ‘Next’.
The final page is the Publish Your Team page. Here you can tap and drag the slider to indicate how many players you’re looking to add to your roster, and a checkbox to indicate whether or not you are offering scholarships for certain players.
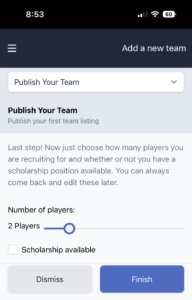
Now you are finished with creating your team and you can tap ‘Finish’.
You’ll be directed back to the Teams tab and you’ll see a popup to confirm your team is live.

You can close this popup to see the Teams tab with your new created team.
Now your Teams tab shows your teams cover photo, a way to share your team with a custom short link or to share directly to Twitter or Facebook.
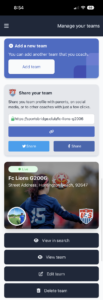
You’ll also see quick action buttons under your team cover photo. These buttons are:
- View in Search – this opens a new tab for you to see how your team appears in search when parents are looking through the teams.
- View Team – this opens a new tab where you can see what your profile looks like
- Edit Team – This opens the team editor and allows you to make any changes to your team
- Delete Team – This allows you to delete your team
Now if you navigate back to your Dashboard you’ll see it has also populated with your team information.
